Thursday, November 29, 2012

Cookie Exchange Invitations


I know I have been horrible at blogging but I have been kept busy by all of the birthday charts that are being ordered from my Etsy shop.  Thanks everyone that has purchased one! It has helped out little family out a lot :-)

So anyway I organized a cookie swap with some of my friends up here in Portlandia and I finally got the invitations made.  Don't worry we still have 2 days before the actual cookie exchange haha.

I made the invitations using my silhouette.  I cut out scalloped tags and oven mitts then tied it with ribbon to a Cookie spatula I got from the Dollar store.

If you have never been to a cookie exchange before the general idea of it is to hang out with your best buddies and get really fat.  Just kidding ... kinda.  Here's how we set it up:
-Everyone needs to make a different type of cookie to share.
-This year we have about 12 ladies that are doing it so we have everyone make 3 cookies to share with each person involved in the swap.  So all in all everyone will be making about 3 dozen cookies.
- Everyone brings their cookies pre-packaged in little baggies, plates, etc.
-We meet at my house to exchange all of our cookies.  Everyone should bring a bag or tray to carry all of their cookies back with them.
-Then we go out to lunch together and let the men deal with the kiddos for a couple hours ;-)
-Finally, eat a crap ton of yummy cookies!

Enjoy!

Labels: ,

Sunday, June 10, 2012

Garage sale makeover: Medicine Cabinet

Medicine Cabinet Makeover!
I picked this gem up at a local garage sale for about $3
I made sure to sand it really good because it kind of  had a varnish finish on it
Then I painted a lovely gray color 
And then I used my die cutter to cut out some decorative shapes.  Then I used modge podge to seal them on there, or you could use vinyl!

Labels: , , ,

Spice Cabinet Makeover

Spice Jar Organization!!
Before :-( 
I got a bunch of baby food jars (the bigger size which I think is size 3?) and cleaned them out.   Then, I used my Silhouette Cameo and some nifty chalkboard vinyl that I got to create labels for my jars. I rubbed some chalk over the labels to "prime" them so the chalk would stick better.
I spray painted the baby jar lids blue, red and green. 
The AWESOME spice rack my hubby made for me!
Ahhh so much better! Now I just need to do the rest of my pantry ;-p

Labels: , ,

Wednesday, May 2, 2012

Time out stool Tutorial

So I saw this timeout stool on Pinterest and I really wanted it but since I'm poor and I didn't want to pay $70 and who knows what for shipping I thought to myself "I can make that"!  All the materials cost under $25 to make.  The only thing you may need to worry about is that the plastic bottles are not very durable so if they get dented I'm not really sure how you would pop them back out?
Made this bad boy this weekend and all the materials cost under $25!  It ended up being 14" high and 12" wide.
You will need: (2) empty clear soda bottles, (2) 12" wood or MDF circles (I found mine at Lowe's), (3) 14" legs (We trimmed the long end down so they were 12" long), (1) 2" wood doll head (I found mine at my local craft store), spray paint, washer (make sure it fits the top of your bottle), CLEAR silicone sealant, and optional clear spray paint (for a shiny finish).
First we routed the edges of the MDF circle so the edges of the circle wouldn't be as sharp for our boy when he sits on it.  This is an optional step though if you don't have a router it is not essential.
Drill a hole through the center of the wood doll head.  Hopefully it has a predrilled tiny hole in the center so it will guide your drill bit, if not I would recommend doing that first.  
Make sure the bit you use cuts a hole big enough for the top of the soda bottles to fit in.  We used a 1'' bit but then had to sand out the inside a little so it fit on easier.  This is what your wood doll head piece should look like when your done.
We also used a router to indent a circle into the MDF circle so the soda bottle would sit  could butt up against the edges and fit nice and snug.  Again this is optional if you don't have a router but it just insures no salt will leak out.
After we had cut circles and legs of the timer to a size we wanted we had to measure the height the hour glass needed to be and cut the soda bottles.  Don't forget to incorporate the routed indent in the MDF circle and the height of the wood doll head in your measurement.  Always measure twice so you only have to cut once. (We learned that the hard way!)
Here is our beautifully spray painted wood pieces.  Make sure you do a couple of coats.
We made an 8'' equilateral triangle out of a piece of paper to mark spots for the wooden legs.  It makes sure they are evenly distributed.  Then we predrilled holes for the screws so there is less of a chance of splitting your wood and the screws go in strait.
We also used a this drill piece, I have no idea what its called, to  cut out a cone shaped piece in the MDF circle so the screw head will sit flush with the top of the circle and not poke out.  
Instead of using the equilateral triangle again we put the two circles together and drilled all the way through them to make sure both circle had evenly distributed holes for the legs to be drilled into.
We also drilled holes into the top and bottom of the wooden legs to make sure they were screwed into correctly
We "dry fit" our pieces together to make sure everything fit before glueing or screwing 
We used a clear silicone to attach our soda bottle to the MDF circle.  It goes on white then dries clear so you know when its dry.
Before you glue on your washer play around with how long you want your sand timer to be.  You might need to drill drill a bigger hole into the top of the washer like us to make sure you have the right amount of sand in your timer and enough sand to make it aesthetically pleasing.  We glued the washer onto the soda bottle top using E6000 glue.
After getting our timer down we added salt, instead of sand because we liked how it was white, to the soda bottle on the side without the washer.
Add your clear silicone to one soda bottle
Then add it to the other side
And attach your wooden doll head and the two sides together.  Make sure that all the edges are completely sealed because you don't want any sand to get out.
Add wood filler on top of your recessed screws and scrape the excess off with a credit card to make sure its flat.  If you need to sand the wood filler down a little bit you can after it has dried. And then add one more coat of spray paint on top.  You can also do a clear coat of spray paint or some polyurethane to give it a nice shiny finish.
One cute boy who I think likes his timeout stool too much ...

Labels: , ,

Tuesday, March 20, 2012

Hooded towel tutorial

I love hooded towels for babies and little kids. One of my friends made me a super cute one for my boy and I have made a couple for friends. They are so easy and they make great gifts!

First you will need:
-1 cute little kid ;-)
-1 bath towel
-1 hand towel
-Coordinating ribbon or a scrap of fabric (at least 4"x24" size piece of fabric)
-Coordinating thread
-Extra wide double fold bias tape that matches the color of your towels. (This is optional but I think it makes it easier to finish the raw edge instead of trying to fold it up and sew through a bunch of thick layers of towels with your sewing machine)

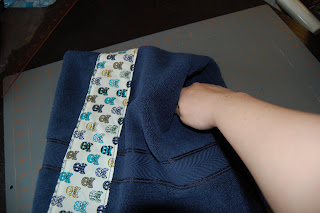
Here is my little fella all wrapped up in his new hooded towel
First, take your hand towel and cut it so it is 24" long
If you are using fabric, cut it to 4" wide by 24" long.
Press the edges of your fabric up 1/2" along the long raw edge
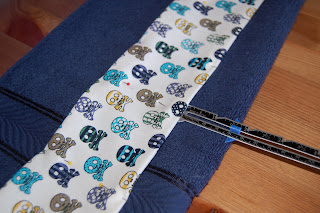
Fold your hand towel in half lengthwise (hot dog style!) and place your strip of fabric or ribbon about 1 1/2" away from the fold and pin it.
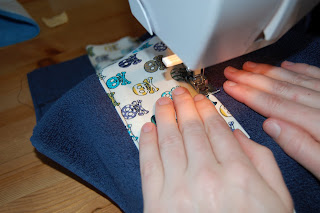
Un fold your towel and sew along the long edge of your fabric.
I cut off the bulky hem on my hand towel to make it easier to sew through.
Fold your towel in half hamburger style (Right sides together) and sew along the edge of you short sides (the ones with the arrows in the picture). I apologize for the graphics in this pictures but I'm not fancy and I don't have photoshop so this is what I came up with in Paint haha :-)
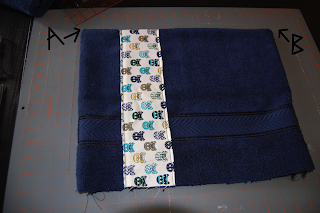
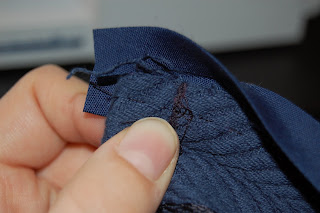
Flip it right side out and it should look like this. With all the sides sewed except the bottom edge. Take Corner "B" and tuck it into corner "A".
Here is a picture of me tucking corner "B" into corner "A"
So it should look like this.
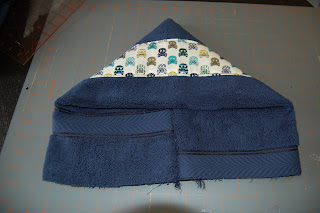
This is your hood! You can cut the bottom edge of your hood so it all lines up evenly or if you have a bulky edge you can trim it too.
I like to sew a 1/2" hem along the folded side (the side that will wrap around your child's face) just so that it lays flat. This is not necessary I just think it makes it nice.
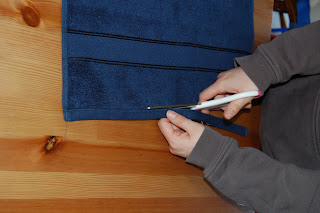
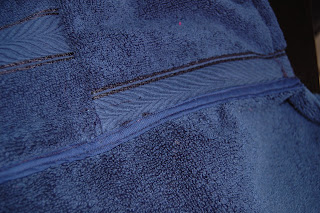
Now for the bias tape. This is the trickiest part! I know it's kinda hard to tell from the picture but one of the edges sticks out 1/8" more. You want to have the side that sticks out 1/8" on the bottom and the shorter side will be the one you sew on top. You want the wider side on bottom so that you make sure it catches underneath when you are sewing.
I like to sew my bottom raw edge together before I put the bias tape on it so I don't have to worry about it shifting apart while I sew the bias tape on. Wrap your bias tape around the bottom raw edge of your hood and pin it.
Here is my hood with the bias tape pinned on it
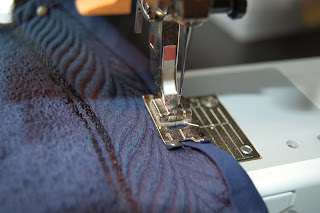
Start sewing along the top edge of the bias tape. I would recommend taking out the pins as you go so you make sure that the bias tape isn't twisting or starting to slip off of the edge. Sometimes you have to pull it tight and pull it up as you go. Then trim any excess bias tape off of the ends.
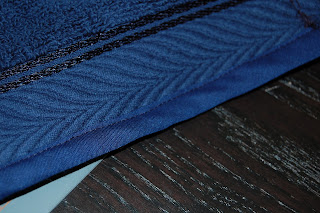
This is what it looked like after I was done sewing it on.
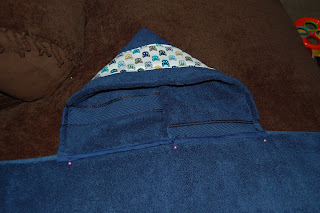
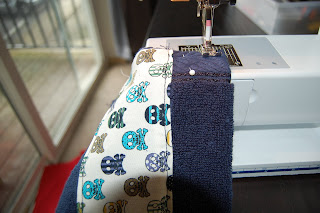
Find the middle of the long ledge of your a bath towel and center the hood and pint it.
Sew your hood onto the bath towel along the bottom edge of your bias tape.
Then I like to flip it over and sew along the top edge of the bath towel to make sure its all secure.
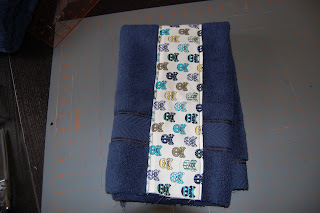
Voila! This is how my hooded towel turned out. This is a picture of the inside of the hood where it is sewn onto the bath towel.

Labels: ,